Crafting a Thanksgiving Icon Shadow Box Papercut
A well-designed shadow box can instantly transform a plain wall or mantel into the focal point of your thankful season decor. It is eye-catching, draws immediate attention, and adds significant visual interest to your living space without requiring expensive renovations or bulky furniture. The warm design of a rustic 3D paper cut makes anyone feel welcome the moment they walk through the door. Unlike flat prints or standard framed photos, these layered creations offer depth and texture that mimic the cozy atmosphere of autumn itself.
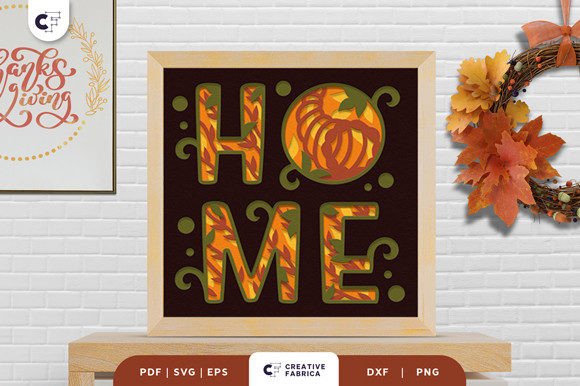
At its core, a Thanksgiving Icon Shadow Box Papercut is a multi-layered art piece where each layer represents a different element of the scene, stacked slightly apart to create a three-dimensional effect. Imagine a lush forest scene where the front layer features detailed foliage, the middle layers reveal deep woods and wildlife, and the back layer sets the sky or distant horizon. In the center, you might find the word "Thanksgiving" written in elegant script, anchoring the theme. This specific type of project typically involves seven distinct layers that develop into beautiful ornaments when assembled correctly. The result is a lush 3D forest vibe that brings the outdoors inside, perfect for home interior design during the fall months.
Why Choose Layered Paper Art for Fall Decor
There is a unique charm to paper crafting that digital displays simply cannot replicate. The tactile nature of cardstock, combined with the play of light and shadow between layers, creates a dynamic viewing experience. As light hits the box from different angles throughout the day, the shadows shift, making the artwork feel alive. This is particularly effective for Thanksgiving, a holiday centered around warmth, gathering, and reflection.
For beginners and hobbyists alike, this project strikes a perfect balance between accessibility and professional results. You do not need to be an expert illustrator to create something stunning. The heavy lifting regarding design complexity is often handled by pre-made digital files, allowing you to focus on the satisfying process of cutting, layering, and assembling. Whether you are a small business owner looking to create unique holiday products, an educator teaching fine motor skills and patience, or a homeowner wanting to refresh your seasonal decor, this medium offers immense value.
The appeal also lies in customization. While a standard Rustic Thanksgiving 3D paper cut might come with a specific color palette suggested in the preview, you have the freedom to choose papers that match your existing home aesthetic. Prefer burnt oranges and deep crimsons over forest greens and browns? You can easily swap the cardstock colors to suit your taste. This flexibility ensures that your final piece feels personal and integrated into your space rather than generic.
Essential Tools and File Formats
Getting started with a Thanksgiving Icon Shadow Box Papercut requires minimal investment in tools, making it an ideal entry point for new crafters. The process begins with selecting the right digital format. Most high-quality designs are available in a variety of file types to ensure compatibility with your preferred method of creation:
- SVG: Ideal for electronic cutting machines like Cricut and Silhouette. These files allow the machine to read the vector paths for precise cuts.
- PDF & EPS: Great for printing at professional shops or scaling without losing quality before hand-cutting.
- PNG: Useful for previewing the design or using in digital mockups if you are marketing a finished product.
- DXF: Another robust vector format compatible with many older or industrial cutting plotters.
If you own a cutting machine, the process is streamlined. You simply upload the SVG file, select your material settings (usually cardstock between 65lb and 80lb works best), and let the machine do the work. However, lacking expensive equipment should not stop you. If you do not have a cutter, you can absolutely use an art knife, a self-healing mat, and a metal ruler. Hand-cutting takes more time and requires a steady hand, but it adds a human touch that many collectors appreciate. Just take your time with the intricate details, especially around the text in the center of the design.
Step-by-Step Assembly for Best Results
Once your seven layers are cut, the real magic happens during assembly. This is where the flat pieces transform into a 3D forest with depth and dimension. Here is a practical approach to building your shadow box:
- Prepare Your Workspace: Ensure you have a clean, flat surface. Gather your glue (a low-temp hot glue gun or strong craft adhesive works well), tweezers for handling small pieces, and foam tape or spacer dots if your design does not include built-in tabs.
- Identify the Layers: Lay out all seven pieces in order from back to front. Most files are numbered or named sequentially to help you align them correctly.
- Align the Base: Start with the background layer. This is your foundation. Ensure it is perfectly straight within your frame or box structure.
- Add Spacers: Apply adhesive spacers to the back of the second layer. Consistency is key here; uneven spacing can make the final look messy.
- Stack and Press: Carefully place the second layer onto the first, pressing gently to secure the bond. Repeat this process for all subsequent layers, working your way to the front.
- Final Touches: Once the top layer is attached, inspect the edges. Remove any stray glue strings or dust. If you are framing it, now is the time to seal the box.
The standard size for many of these designs is approximately 20.32×20.32 cm (roughly 8x8 inches), which fits perfectly into standard square frames found at most craft stores. However, always check the specific dimensions of your download before purchasing materials.
Creative Uses Beyond Home Decor
While hanging this art in your living room is a popular choice, the applications for a Thanksgiving Icon Shadow Box Papercut extend far beyond personal decoration. For entrepreneurs and freelancers, these designs represent a viable product line. Finished shadow boxes sell well at local holiday markets, on Etsy, or as custom gifts for corporate clients seeking unique seasonal branding.
Educators can use simplified versions of this project in the classroom to teach students about perspective, layering, and the history of Thanksgiving. It serves as a hands-on activity that encourages patience and attention to detail. Additionally, bloggers and content creators can use the assembly process as engaging video content for social media platforms, showcasing the transformation from flat paper to 3D art.
When choosing a design, keep in mind that preview images are often digitally enhanced. The actual final product color may vary slightly due to lighting sources and the specific brand of cardstock you choose. It is always wise to test cut one layer first to ensure your machine settings or knife technique yield clean edges without tearing the paper. With the right preparation and a bit of creativity, you can make this autumn 3D design feel incredibly welcoming, creating a cherished centerpiece for your holiday celebrations year after year.